Showing posts with label sewing. Show all posts

Tuesday, March 6, 2012

sew fun


I had a major urge to sew this weekend. A new Joanns location opened up nearby and I finally got to go. While I was browsing the fabric I decided on making the baby a pillow cover for his rocker and then a blanket. I'm totally obsessed with seersucker for the little man. It's just so cute and preppy. 


I used my silhouette machine to cut out the template for the anchor and traced it on some scrap canvas I had. I love the blue against the grey knit throw.


And here's his blanket. It's so cozy. I will say that dot chenille is a bit challenging to sew because it has lots of stretch to it. It wanted to pucker a lot- I suggest tons of pins! The whale print is in a soft flannel. 


And of course I'm learning slowly you can't make something for one child and not the other so Lucy needed one too. 


I should have made her one a long time ago, she loves it. 


I could sew and and sew and sew. I've enjoyed it so much lately. There are a couple of skirts and dresses I'd like to make L this spring. I'd love to take a class someday to learn more about my machine.  I swear it's one of the best gifts Nicks ever given me. Does my man know me or what? 

Sarah

Wednesday, January 18, 2012

ruffles abound


I feel a bit like Oprah lately walking around my house and informing inanimate objects "YOU GET A RUFFLE AND YOU GET A RUFFLE!!!"


I think I've got a serious case of the girlies... 


Always have though.


Can't help it. Luckily I married a guy who doesn't mind. 


Have a beautiful day!

Sarah

Wednesday, January 11, 2012

its wed-nes-day


Hey it's "hump day!" I always hated that saying it makes me cringe for some reason. I'm going to work on a birthday gift for Lucy while she naps and do some knitting for the baby. 


What are you up to? I'd love to hear!


Sarah

Tuesday, November 22, 2011

little victories


Nick: Hey Sarah?
Me: Don't talk to me right now, I'm about to attempt "the ruffle" 
{Nick walks away}

25 minutes later

Me: Nick!
Nick: Yeah?
{Nick enters}
Me: I did it! I did it! Yeaha! Woot!
Nick: Looks nice!
{me pulling out my ipod earbuds}
Me: Do you think I'm the only one that sews to Jay Z?
Nick: Probably


Pay no attention to the table that's not set and bad lighting. It's not about that ya'll. I've been trying to find the right settings on my sewing machine for TWO years to make a ruffle. It's not fancy by any stretch but it sure was a shot of confidence in my arm tonight. 

Tomorrow the pie baking commences. This time of the year is tops! 

Sarah

Monday, June 6, 2011

mini boden inspired tee DIY

I love the mini boden applique t-shirts like the one below! I have been a fan ever since I saw them at Nordstrom when I was pregnant with Lucy. They're just so sweet and colorful. 
What's a little scary though is the $30 price tag for a toddlers t-shirt. Last fall I made a Pear shirt and now that it's nice a warm outside I've been re-inspired to make another version. I went with a strawberry and I chronicled my easy steps below for you. Enjoy!

First settle on the image you want. I decided on a strawberry to I googled "strawberry graphic." Several options came up and I chose the best one and cut and pasted into a word document. 


Once it was there I adjusted the size of the image and printed it out on white card stock then cut out the pieces. 


Next I dove into my fabric pile and pulled out a pink piece for the berry and a green piece for the leaf. {I'm showing two of everything because I was also making one for my niece} 

*Optional I ironed on fusion paper to the back of the fabric before I traced my pattern on the back. The fusion paper will help hold it all in place for you and make it much easier to sew on later.


next cut out your pieces


I bought toddler t-shirts from Target. I like them because they wear well and come in many colors.


If you used the iron on fusion paper next you'll want to peel off the paper backing from your cut outs and place them on your shirt exactly where you want them.


After the design is in place lay a spare piece of fabric or a towel over the top and press your iron over the design for about 20 seconds. Check it to see make sure you didn't miss any spots and do touch-ups where needed. 


Now you'll have something that looks like this!


Lastly using my sewing machine I stitched around the border of the strawberry and leaf to secure it. 

And Ta-Da!


a sweet summer time tee! 

linking up to:
Sarah

Monday, January 17, 2011

union jack pillow

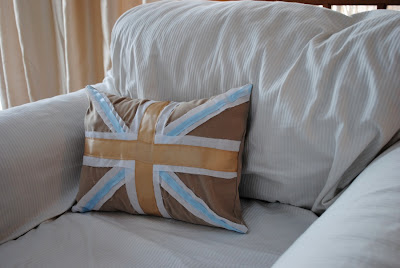
Everywhere I turn lately I see such sweet union jack decor. I decided to hop on the bandwagon and create my own. I couldn't wait to jump on this project and I knew my mom would love one too and with her birthday this week it was motivation enough to get started so this is how I spent part of my weekend. I bought a couple of yards of tan moleskin fabric from Jo Ann's along with some pretty ribbon. The inserts are 12''x16''s from Walmart. I've never really made a pillow cover before but I thought the envelope closure looked pretty simple. After the first cover was done the next two went fairly quickly. I made three all together because of course I needed one and I knew one would be perfect for Nicks momma too. Look out world of pillow covers I'm hooked now!


simple envelope closure


light blue ribbon version


I left the muslin unhemmed for a messy frayed look.


seafoam green ribbon versions 
(ribbon from the Martha Stewart line at Michael's on clearance right now. RUN!)

***
update! due to all of the positive response i've added them to our etsy boutique (link to arkanoffdesignco.@etsy is located on the side bar)


linking up to