Showing posts with label DIY. Show all posts

Thursday, May 10, 2012

chevron picture frames

Living in a tri-level we have some challenging spaces for example I've always loved the idea of a gallery wall but the way half our stairway is open it wasn't exactly conducive to a traditional staggered gallery wall set-up. I had seen these large chevron  picture frame projects a few times on blogs and Pinterest and I decided that the large size would be perfect to fill the space. Using paint I already had and 3 pre-cut boards from Lowes and some dollar store frames I got to work taping painting and sanding. I love how they turned out and I like the idea of switching out the photos like a rolling gallery .


If you're looking for a great tutorial for this project- I followed {this one}


Have a beautiful day!

Sarah


linking up to:
the shabby creek cottage

Thursday, February 16, 2012

thrifty find

On a recent trip to Goodwill I came across this giant gold mirror with pretty curvy lines. Now I've noticed lately that the Goodwill by my house has a nasty habit of marking up mirrors to a premium but I decided it was worth the effort to move a few things out of the way and look for a price on the back. The tag read $15.99, ok I'm listening... any cracks or scratches to the glass? Nope. Frame in good shape? Yup. Even better I saw that the back panel was screwed on as opposed to glued or taped so I knew it would be easy disassemble and paint the frame. Of course I had no idea where I would put it but since I'm a total furniture hoarder (you should see our garage) that didn't matter. 

Unfortunately I didn't have the forethought to take a before picture but just imagine it in a brushed gold color with little black splatters. I sprayed the frame with KILZ primer spray paint and then painted it white and added a little glaze to bring out some definition- all supplies we had hanging out in the garage already. It ended up finding a new home in our foyer and is almost 3 x's the size of the old mirror that preceded it. We can't believe the difference in light and airiness it brings! 


and just to keep it real, we may be shoe hoarders too...


I'm pretty happy about how it turned out and for $15.99 if we grow tired of it down the road we don't have to feel bad about changing things up. 

Hope you guys are having a great week, I can't believe it's almost Friday. I'll do a Pinspiration Friday tomorrow because to be totally honest I spaced it today. Oh well, such is life. =)

Thursday, January 19, 2012

ruler growth chart


I had been really wanting to make one of these ruler growth charts for several months and we finally got around to it last weekend. I'm loving the way it turned out and it's the perfect addition to our hallway. 


I used my silhouette that I got for Christmas to cut out the numbers with card stock to use as stencils. The  lines and numbers are done with a sharpie which worked perfectly- no bleeding.


Finished and all hung up. We used the biggest anchors I've ever seen to secure it to the wall.


I transfered Lucy's height markings from the door frame in the playroom where we had been keeping track. I love the idea of if we ever move someday we can take it down and bring it with us. 


Special thanks to this guy for doing such a great job! 


Supplies we used:
1- 6 ft. board
walnut stain
sandpaper 
wall anchors and screws
package of fine point sharpies
tape measurer
level
ruler
drill

Message me if you have any questions on the specifics and I'd be happy to share them with you! 

Hope you have a beautiful day! How did we get to Thursday already?

Monday, January 16, 2012

the ruffled nest wreath


I started itching to make a new wreath for our entry over the weekend. I used a straw form to start and wrapped it in a linen blend fabric. Next I ripped a couple of strips of the same fabric and ruffled them using my sewing machine and then wrapped those around the wreath. 

After that I enlisted the help of my favorite apprentice to help me roll the wooden robin eggs in glitter.


Meanwhile while the eggs were drying and after putting Lucy down for her nap I ripped off a piece of moss and glued it to a notecard. {I wanted it to be removable in case I ever want to switch it out but you could glue it right on the the fabric if you want} Next I glued the little nest onto the moss and pinned the card onto the wreath. 


The scene unfolding looked something like this mess...


My eggs were dry and ready to be glued into the nest.


And that's it! It took way less time than I had anticipated which is always nice and was relatively inexpensive to create. I already had the wreath form, fabric, and moss. Everything else was purchased at Michaels. 


 I hope you have a beautiful Monday and a super inspiring week ahead!

Wednesday, November 23, 2011

dining room family tree


I hope everyone is having a beautiful and productive day getting ready for tomorrow! I decided to check in really quick with a couple of snapshots of our dining room Christmas tree. I went very simple this year just using ornaments and feathers we already had. I also added a few ripped muslin bows and printed out my favorite family photos from the year onto card stock to really personalize it. I can't wait to go and pick out our giant tree for downstairs tonight! 


Happy cooking/baking/family time! 

**Inspiration for the tree found at Dear Lillie! 

Sarah

linking up to:

Tuesday, November 22, 2011

little victories


Nick: Hey Sarah?
Me: Don't talk to me right now, I'm about to attempt "the ruffle" 
{Nick walks away}

25 minutes later

Me: Nick!
Nick: Yeah?
{Nick enters}
Me: I did it! I did it! Yeaha! Woot!
Nick: Looks nice!
{me pulling out my ipod earbuds}
Me: Do you think I'm the only one that sews to Jay Z?
Nick: Probably


Pay no attention to the table that's not set and bad lighting. It's not about that ya'll. I've been trying to find the right settings on my sewing machine for TWO years to make a ruffle. It's not fancy by any stretch but it sure was a shot of confidence in my arm tonight. 

Tomorrow the pie baking commences. This time of the year is tops! 

Sarah

Wednesday, November 16, 2011

mod podge tissue transfer to canvas


I read about this really neat way you can run tissue paper through your printer and then mod podge it onto canvas (I used canvas board for this project) and you get the same pretty effect as a printed wrap canvas. You can view the full tutorial here. After my transfer was dry I decided to add some velvet and burlap trim. I also attached a loop of twine to the back so it could be hung. 


I'm very happy with the way it turned out especially for a project that cost me nothing since I just used what I had on hand. These would make great holiday gifts for grandparents. They could also be made smaller and could be used as ornaments!


Happy Wednesday!

Sarah

linking up to 

Monday, October 31, 2011

We needed a hair bow command center. The top of Lucy's dresser was getting out of control. It was so easy I wish I would have made one a long time ago. They would also make very nice gifts if you know any sweet little girls.

Here's all you need:
*Glue gun
*Wood letter {i purchased mine at Michaels}
*Ribbon {about 2.5 ft}
*Scissors
*Embellishments {optional}
*lighter {optional}


 gather up your supplies


Glue your ribbon to the back of your letter and trim 


Take your lighter and lightly go over the bottom part of your ribbon to prevent fraying


Glue on any embellishments you might have to the front of your letter


Hang and clip away. 
Now we have a nice and neat organized place to keep all of the "pretty's"

***

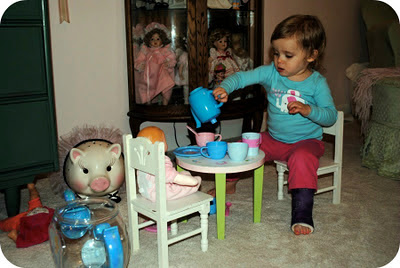
Here's my sweet pea having a Sunday night tea party with her babies and her daddy. She takes her tea party time very seriously and it cracks Nick and I up. She's doing a little  better with her cast these days but still not quite walking. We go back Tuesday for more x-rays, fingers crossed everything is healing well. 


Sarah


{linking up to}

Thursday, June 9, 2011

spray painting crown molding

I knew when we bought our house that the natural wood trim that was everywhere would need to be addressed. The one part I was really not looking forward to was the the crown dental molding in the living/ dining area. I painted our fireplace mantel which had the dental molding and it took forever getting in all the tiny little spaces. I knew eventually it would just take me just getting fed up with looking at it and that day happened a couple of weeks ago. 

Here's what the living/dining area looked like when we first saw the house


My mom had come for lunch one day a while back and suggested spray painting it. I scoffed at the idea because I thought it sounded like a huge mess and I didn't know how good it would even turn out. But the more I thought about it {and after brush painting a 5 foot section that took 3 hours} the thought of spray paint was growing on me. I decided to google it to make sure I wasn't insane and it turns out others had tried it first and had success so I took the plunge. 

Since the moldings had been stained I decided to go with a white- oil based- low odor primer from Sherwin Williams. I taped off the area and added a strip of kraft paper underneath the tape to protect the wall. I also pushed the furniture away as I went and used drop cloths on the floor. I had the whole area done in about 3 hours including prep time. It was a breeze! 


 {btw- did you spy the new tolix chair knock offs from overstock? The verdict- they are an awesome steal for the price and I think they'll serve our family well with their durability. }


I'm so happy with the result and while I plan to add a topcoat someday this primer will do for now. It feels so much bigger with out the visual line confinement outlining the room and the fresh coat of paint on the walls helps too. 

A few $4 cans of spray paint who knew?


Sarah